
This article will walk you through the plug-in scanning process in GarageBand.
Please note: Antares plugins are not officially compatible with GarageBand. Some users may encounter issues with license authorization while using GarageBand. For the latest compatibility information, please refer to our DAW Compatibility page.
Installation and Compatibility:
If your plug-in is not showing up in GarageBand, please be sure that you have installed the 64-bit AU version of the plug-in.
GarageBand 10 does not support 32-bit plugins. If your license is for an older 32-bit version, you may need to first purchase an upgrade.
Scanning For Plug-Ins
If you have installed a compatible 4-bit AU plugin, and that plug-in is not showing up in GarageBand 10, please follow these steps:
1. Quit GarageBand if it's open
2. Click on your Desktop wallpaper to focus the Finder
3. Click on Go in the menu bar, press and hold down the 'Option' key, and click on Library. This will take you to the User Library folder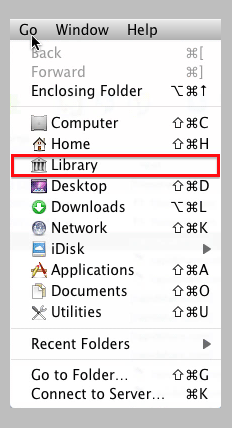
4. In the User Library folder, open the Caches folder and then the AudioUnitCache folder.
5. Move the com.apple.audiounits.sandboxed.cache file to the Trash
6. Go back to the User Library folder (repeat steps 2 and 3)
7. In the User Library folder, open the Preferences folder
8. Move the com.apple.audio.InfoHelper.plist file to the Trash
9. Empty your trash and restart your computer
The next time you open GarageBand, it will re-scan all of your installed AU plug-ins.
Comments
0 comments
Article is closed for comments.